Last Updated on 4 July 2026 by David
Polished travertine floors in Gloucester frequently lose their luster due to deep scratches, visible voids, degradation of fillers, and surface wear that disrupts the protective layer over the stone’s natural void structure. By employing controlled diamond honing, powder polishing, colour-matched filling, resin repairs, and colour-enhancing sealing, we successfully revived the finish without excessive abrasion of the calcium-carbonate surface.
How to Restore Dull Patches and Holes in Polished Travertine Floors in Gloucester
If your polished travertine floor exhibits dull patches, visible holes, or deep scratches, you may be able to restore it without a complete replacement. In a Gloucester GL4 residence, the travertine floor had been well-maintained over the past decade, yet some areas had lost their shine due to wear, small voids, and deeper scratches affecting the polished finish.
While the overall surface remained intact, its appearance varied significantly under different lighting conditions. The worn sections became increasingly noticeable, particularly as the adjacent tiles maintained a higher sheen, thus accentuating the contrast with the damaged areas.
In my experience, this type of wear typically indicates a localized finishing issue rather than inadequate maintenance. The homeowner sought professional guidance on potential enhancements, including which scratches could be minimised and how to effectively address the visible holes before further damage occurred.
The initial project photograph illustrates the floor’s condition prior to the repair and polishing process. The marked areas highlight the types of holes that disrupt the polished surface, making small imperfections appear more pronounced than they feel underfoot.
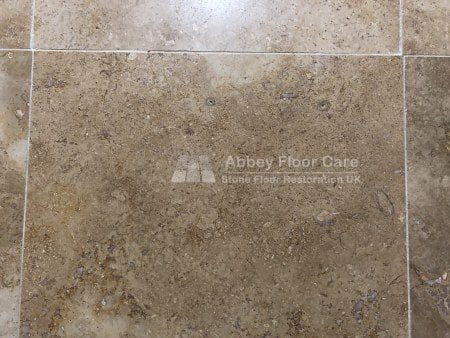
Honed and filled travertine is a popular choice in UK homes because the factory-filled surface provides a smoother, more practical finish than open, tumbled stone. In Gloucester, areas such as kitchens, hallways, and living spaces often show the first signs of finish deterioration, particularly in spots where grit, chair movement, or heavy foot traffic accumulate.
This was particularly relevant in this case, as the damage interrupted an otherwise well-maintained installation. The project required a controlled refresh: identifying the holes, assessing the depth of scratches, restoring the local finish, and protecting the surface while preserving the inherent character of the travertine.
Why Removing Deep Scratches and Colour-Matched Filling Were Essential for Effective Restoration
Grinding out every scratch from polished travertine is not always the optimal approach, as it can result in noticeable dips in the surface. Effective deep scratch removal involves reducing the surface to match the depth of the damage, employing a feathered technique instead of a hard-edged patch.
Careful Feathering Techniques for Localised Scratches
If your polished travertine has a scratch that reflects light differently from the surrounding areas, it is likely located below the level of the surrounding shine. The primary risk lies in over-cutting the delicate calcite layer above the cavity zone; excessive abrasion can disrupt the surface plane, making the repair visible even after polishing.
During this phase, diamond honing concentrated exclusively on the areas requiring correction. The scratch lines were treated with controlled pressure and a gradual refinement process, ensuring that the repaired areas blended seamlessly with adjacent tiles without creating any hollow or flat spots.
Colour-Matched Filling for Open Holes
If your polished travertine tile features open holes that appear darker than the stone itself, they are perceived as damage due to the compromised smooth surface. The repair employed a filler that matched the tone of the surrounding stone, allowing the holes to be stabilised and visually softened without erasing the floor’s natural features.
Natural voids are part of travertine’s formation and do not necessarily indicate instability in the floor. The dense calcium-carbonate material surrounding the voids remains stable, yet visible pits on a polished surface require selective filling when they disrupt the finish or collect dirt.
The second project photograph illustrates the holes after they were filled. The repair material required time to cure before the surface could be honed flush, as premature polishing could compromise the repair edge, preventing a smooth blend with the tile.
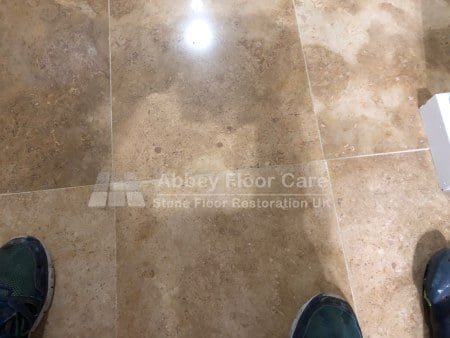
Implementing Two-Stage Filling and Finish Blending Techniques
If a repaired travertine hole appears raised, low, or mismatched, the surrounding polished surface will continue to emphasise the imperfection. The Gloucester repair employed a two-stage process: first stabilising and matching the visible holes, then refining the cured repair to align it with the surface prior to final polishing.
Resin-based fillers are particularly advantageous when the repair necessitates a tighter, more durable bond than a loose surface patch. This method also facilitates a more comprehensive finish recovery since the filled areas can be finished flush, refined, and polished as part of the same visual plane.
The small-hole repair aspect serves as a supporting stage within this case study rather than the central focus. Readers seeking detailed information on hole filling can refer to the dedicated travertine tile repair guide, while this Gloucester project centres on polished finish recovery.
How Diamond Honing and Powder Polishing Restored the Shine Without Excessive Abrasion
Diamond honing and powder polishing techniques are designed to gradually restore shine while ensuring that the surface remains intact. In the case of the Gloucester floor, a full grind was unnecessary since the main surface was functional; thus, the controlled work focused on the repaired holes, deeper scratches, and worn polished areas.
The progressive honing pads refined the corrected areas through a measured 400–3000 sequence. The coarser stages reduced the scratch profile, while the finer abrasives restored surface refinement, allowing the treated zones to match the sheen of the surrounding tiles.
Restore the shine gradually, without removing more travertine than necessary.
The application of powder polishing compound then elevated the refined surface from a honed sheen back towards a polished finish. This compound enhanced depth and clarity after the abrasive stages had completed their corrective work, which is why polishing followed the repairs and honing rather than replacing them.
The polishing photograph captures the floor during the finish recovery phase. This stage is critical as the result is assessed by the uniformity of light across the floor, rather than the aggressiveness of the surface treatment.
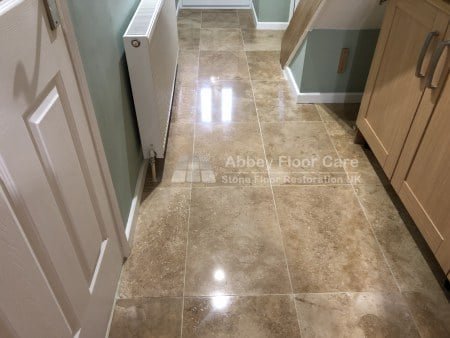
What Improvements Were Observed After Scratch Removal, Colour Enhancement, and Care Guidelines Handover
The final outcome is noteworthy as the floor should present as a cohesive polished surface, rather than a patchwork of repairs. After restoration, the deeper scratches were polished out, the filled holes blended more naturally with the tiles, and the floor displayed a more uniform shine throughout the space.
Colour-enhanced sealing strengthened the visual finish by enriching the surface and assisting the homeowner in maintaining the restored appearance. The handover provided practical advice for the homeowner, including protecting the floor from grit, avoiding harsh cleaning products, and following travertine-specific care guidelines instead of generic stone or tile advice.
The final image showcases the completed floor in Gloucester after the repair, polishing, and sealing processes. The visible transformation reveals a cleaner, more consistent polished surface that appears revitalised before significant decline occurred.
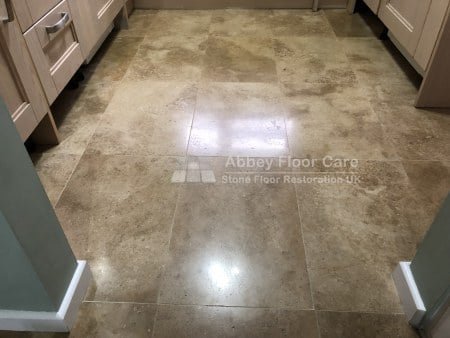
Comprehensive lifecycle guidance belongs on the material hub rather than within this focused case study. For broader advice on cleaning, repair, sealing, and long-term care, please refer to the travertine flooring care, cleaning, repair and restoration guide.

David Allen — Abbey Floor Care
David Allen brings extensive experience with natural stone floors, specialising in practical diagnosis, controlled restoration techniques, and clear guidance for homeowners. His expertise with travertine includes cleaning, selective filling, polishing, and sealing projects aimed at enhancing the floor while honouring the stone’s natural beauty.
The article Travertine Polishing Gloucester For Dull Worn Floors was first published on https://www.abbeyfloorcare.co.uk
The Article Travertine Polishing for Dull Floors in Gloucester appeared first on https://fabritec.org
The Article Travertine Polishing Services for Dull Floors in Gloucester Was Found On https://limitsofstrategy.com
No responses yet